Category Archives: Blum Lifestyle

Skoolies

Apparently there’s a fad/hobby out there where people convert old school buses into RV homes. They call them “Skoolies”. I’ve talked about converting an american trolley into a vardo like wagon in the past. And that’s one of the main projects I’m going to work on once I graduate and finally get a job. I’ve been looking for a quiet place to place a studio but they are all too expensive for my use, especially if I don’t use them all the time. If I converted something into a useable mobile studio I wouldn’t have to bother with leases and I’ll be able to take it anywhere in the world with me.

A typical artist’s studio isn’t suited for my needs either. Typically there’s no internet and sometimes no electricity both crucial for my field.

I’ve seen trolley’s being priced from anywhere between $20k-$30k that’s much more affordable than say a $150k+ studio that I may only use 1/3 of the year. Plus the customization. I can customize accordingly to what I NEED rather than make do with what is given to me. This is my work place, and if you can’t tell what kind of personality I have already, what I do is a big part of my life because I enjoy it. I don’t consider it work.

I also plan on using recycled materials, which will cut the cost down. I’ve done woodworking before so I’m pretty comfortable sprucing up some used wood (IE wood from palettes).

We’ll see what happens, but I really do want to start this project within 5 years after graduation.

DIY Cotton Candy Machine

So using the process above one can make their very own cotton candy machine.

I then thought perhaps a dollar store handheld fan would be a perfect motor:

Take off the blades of the fan and then take an aluminum can and poke holes into it using an awl, or a drill if its something thicker. It doesn’t need to be thicker.

Find a plastic bowl that you can use as a container to catch the spun sugar. Most manufactured machines come with a heater, but for DIY machines you don’t have to have a heater, just have the apparatus by a stove and melt your sugar in a bowl on the stove and then pour it into the holey container.

Attach the fan holder to a piece of cardboard and test your apparatus!

Oh what glorious centrifugal force brings us! 😀

PS: If you buy tonic water and add a little bit of it to the melted sugary mess you might be able to get glowing cotton candy. Tonic water has quinine in it which glows under a black light.

(I hope my mom has her black light bulb still)

“Papier Mache” Clay

Easy Homemade clay, all you need is newspaper and wallpaper paste.

This is the easiest and cheapest recipe for paper clay.

Steps:

1. Get your newspaper
2. Soak it in water.
3. Tear it into strips. Into a bucket
4. Put more water in it so it just barely covers the paper.
5. Stir it up using a dremmel tool blender, food processor or regular blender.
6. Blend it into a pulp
7. Transfer some pulp into another bucket. Poor more water into the 1st bucket and stir more.
8. Get a cotton (or mesh) bag and put pulp in it and strain it.
9. Take strained pulp and put into the 2nd bucket.
10. Take some wallpaper paste and sprinkle it onto pulp.
11. Stomp/Kneed pulp into a clay.

This technique has been the only technique that uses very little glue.

According to www.wallpaperinstaller.com Cellulose is common binder for a substitute for natural gums and a stabilizer in emulsions as well as a thickening agent. It can be simply created using NaOH (Sodium hydroxide) which dissolves the wood or cotton with an alkali.

Cellulose
“Cellulose methyl ether, produced by treating cellulose from wood or cotton with an alkali, such as sodium hydroxide, followed by methyl chloride. The resulting product is a white granular solid, soluble in cold water but insoluble in hot water. In addition to being used as an adhesive, it is used as a thickening agent, as a substitute for natural gums, and as a stabilizer in emulsions.”
-from Bookbinding and the Conservation of Books Dictionary from the Conservation On-Line (COOL) website

“Methyl cellulose occurs as practically odorless and tasteless, white to yellowish-white granules or powder. The pH of a 1% w/v solution is in the range of 5.5 to 8.0. Its angle of repose is about 40 degrees to 50 degrees and it is hygroscopic. It swells and disperses slowly in cold water to form a clear-to-opalescent, viscous, colloidal dispersion. The viscosity is increased with increased concentrations. The viscosity decreases with increased temperatures to about 50 degrees to 60 degrees Celsius, where gel formation occurs. The thermogelation is reversible when the viscous solution reforms upon cooling.”
-from Wade A., Weller P.J. (eds) Handbook of Pharmaceutical Compounding.

In paperhanging, cellulose has the highest water content of any paste in general use (around 97%). It usually comes in a small box and is packaged as a white powder. It is mixed with cold water on the job and can be used with a variety of lightweight materials such as porous papers, grasscloth and silk. It’s adhesion is mostly of the mechanical type. It leaves very little solids behind and is not suitable for many wallcoverings which require greater amounts of initial tack and holding power.

Rug out of old t-shirts

What does it take to transform a pile of old T-shirts into spectacular works of woven art? Just a spare hula hoop or embroidery hoop and the techniques we’ll show you here. The oversize looms and easy-to-use loops of T-shirt fabric make these projects particularly appealing to beginning weavers. Learn the basic hoop weaving technique by crafting a colorful accent rug to brighten up a room. And if you want to take the weaving a little further, check out our basket and chair pad weaves

Before you begin, some terms you need to know: the warp is the material you string on the hoop, the weft is the material you weave with.
Source: http://familyfun.go.com/crafts/hula-hoop-rug-995304/print/

Almond Milk


Fresh raw almond milk is delicious, healthy, unprocessed, and economical. There is no waste, no unrecyclable plastic-lined tetra-pak boxes or cartons to put in landfills and drink BPA out of, and this tastes much, much better than storebought. The resulting almond meal is a free bonus, useful in cookies, crumb crusts, porridge, granolas, or in lieu of bread crumbs in stuffings and dressings, breaded crusts, etc.

To make a half gallon (or 2 liters) of delicious fresh almond milk, you will need:

about a pound (or roughly half a kilo) of fresh raw almonds out of the shell
A blender or food processor
A large bowl to strain into
A mesh bag or cheesecloth for first straining
A reusable fine wire mesh coffee cone or fine muslin bag for second straining
A half gallon or 2 liter refrigerator jug to keep it in
A few pinches of salt (optional)
Sweetener of your choice, to taste (optional)

You will be using about 3 cups of water for every 1 cup of raw almonds out of the shell. Soak overnight in enough water to cover with a little water more, to provide room for swelling. Another easier way to measure if you want to make 2 quarts or 2 liters at a time, is that 1 lb (or roughly a half kilo) of raw almonds out of the shell, makes a half gallon or 2 quarts or roughly 2 liters of creamy, rich almond milk when sufficient water is added after squeezing, to equal that volume. You can of course halve the water to make an almond cream suitable as coffee creamer, nog base, cream pies, or other uses where milk may be too thin.

A quick whir in a powerful blender results in a thick, frothy almond puree, ready to be squeezed in a mesh bag or jelly bag, cheesecloth, or something similar. Simply place your cheesecloth or mesh strainer bag over the bowl, pour and scoop your puree into it, draw it closed, and start squeezing until the almond meal is as dry as you can get it. Don’t add any more water at this point.

The harder you squeeze, the more creamy and nutritious your milk will be, but not to worry, any you don’t get into the milk will still be eaten in the form of the almond meal, so there is nothing wasted. I use a fine plastic mesh drawstring bag that doubles as a shopping bag for small loose items like garlic or peppers.

then pour the undiluted almond milk (that I just strained through the bag into a bowl) through a reusable gold metal mesh coffee cone filter. When it slows, gentle stirring makes filtering go faster. At the end, I press the bit of almond paste in the bottom to extract the last and creamiest bit. This finer, white almond meal is good to keep and dry separately and use as almond flour.

I make this easier by straining it the second time directly into my glass half-gallon refrigerator pitcher, and then adding more water to fill the pitcher, but if you are making an amount different from a half gallon, proceed accordingly to get an end result of 3 cups of water for every cup of almond. You may thin it to taste by adding water, but better too rich than too thin, because too rich can be solved by adding water, but too thin is too bad.

Let it sit covered in the refrigerator pitcher for 24 hours. You will notice a creamy layer floats on top, but with a few gentle shaking sessions and a day or so in the refrigerator, it will blend nicely and taste superbly creamy. Once that has happened, add sweetener if you choose, and salt a pinch at a time, shaking in between and tasting, until the flavor goes from a little “flat” with no salt, to “better than any milk I ever tasted” (perfect). If not sure, hold back on another pinch of salt because one pinch too many ruins it. If you accidentally do add that one extra pinch past perfect taste, add more sweetener and it will no longer taste salty. Some add vanilla, others add almond extract or other flavors. You can even add dutched cocoa for a creamy sensation.

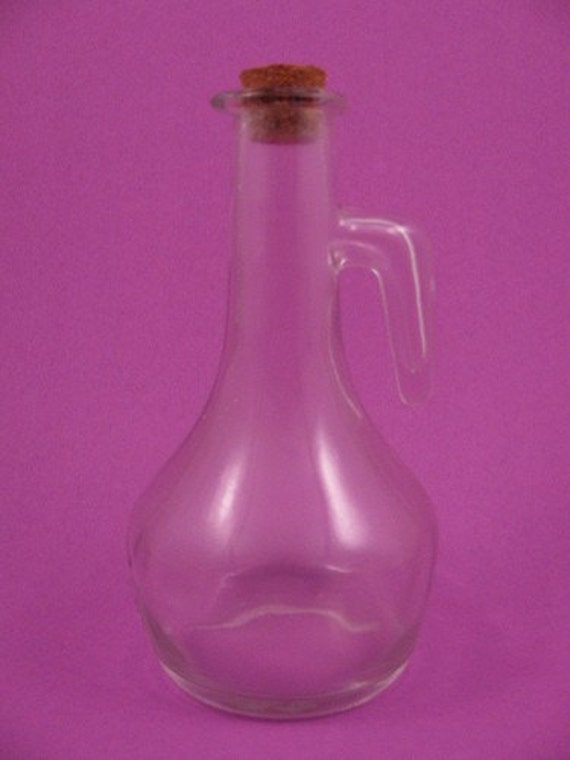
See how this clings to the glass like the freshest dairy milk? Commercial preparations use thickeners such as guar gum to achieve something similar but their results are inferior. It’s hard not to drink it all up the first day, but it’s even better the second. Keeps about a week in the refrigerator, but don’t leave it out on the counter unless you want to experiment with raw almond yogurt or kefir.

Now you can enjoy lowcarb (depending on type and amount of sweetener if any) delicious vegan milk useful in vegan nogs, cream soups, mac-n-cheese, cream pies, alfredo, and so forth, whilst saving money over wasteful inferior pasteurized storebought concoctions, and keep your almond meal for the same price!

As for the almond meal, that may be another Instructable, but briefly, you spread it out on a half-sheet in a 300 degree F oven stirring a few times here and there until toasty and dry. Store in a jar, use as breadcrumbs, crumb crusts, breading, stuffing, cookies, cakes, and bars, or make into low glycemic granola.

Source: http://www.instructables.com/id/How-to-Milk-an-Almond-fresh-homemade-almond-milk/

Crackle/Grunge finish

source: http://makethebestofthings.blogspot.com/2010/05/crackle-finish-with-elmers-glue.html

I want to use the above finish. I’m thinking about making furniture out of paper pulp. I can’t help but imagine it would have an interesting effect since paper is made from trees.

Here is a “video” of how it is done:

Source: Debbie Wijskamp

Although I think I would have to seal it some how after to keep it from warping.

If I get the furniture looking great out of paper pulp, the next thing I’d like to try is to make a boat of it. Since we’re getting a beach house and all, it’ll be fun to see if I can pull it off.